If you’re looking for the download link, scroll down.
Hello! I am Der Ente, you may know me as “that” guy. Recently me (and few of my friends) have been demotivated on making unturned animations. This is due to the fact that the original unturned rig is incredibly painful to work with, even with the auto-ik feature that blender provides.
So this is why I made the AUPR, to make people suffer less while animating with the rig.
This post will elaborate on it’s features and how to use the rig. Before I start, I will answer some question that may be in your head as of reading this.
What makes this rig more advanced than the original one?
This rig adds in inverse kinematics, customizability and a better more ingame default accurate camera. The rig itself is more readable.
Does this work ingame?
Suprisingly enough, yes it does. Although more yellow text will pop up in the unity animation editor saying that the bones are missing, those bones being the IK bones used to manipulate the limbs around.
How modular is this?
Bones wise, I don’t know, but mesh wise and texture wise. You could say it’s pretty modular.
Do I have to credit you to use the rig?
No, you don’t have to, but I would be pretty ecstatic if you did.
Can I sell the rig
Hard no, even if you modify the rig to have extra features or even a different skin.
Before you open the file, make sure you’re using Blender 3.0
Anyways onto the guide.
Part 1: Bones and animation
Once opening the rig file, you should be greeted by this character.
You can move his hands and legs around using the orange blocks when in pose mode
If you would like to attach your model that you’re going to animate use the empties. These empties are set up. These also work for moving gun parts (How to make animate parts for items (using Blender) - Google Docs). Just don’t forget to change to change the name of the empties.
Why is there a second empty on the left hand?
This is incase if you use the “backward” flag in your item .dat
If you want to move the model a bit foward in the animation. Use the blue bones which are the hooks. You shouldn’t manipulate the empties or the model itself if you’re going to move it in the animation.
.When it comes to animating it. You need to know the basics of blender animation, there are many tutorials on youtube. Look up something along the lines of “Blender animation tutorial”. Combine your knowledge of animation with this guide.
Part 2: Exporting and unity
Exporting and unity is pretty much the same as with moving gun parts. Keep in mind, you will be only use the hand animations if you’re planning to use it for an item. This is a “limitation” of the game, not an issue on the rig’s side. Use this guide, if you’re putting in unity, this guide also has the export settings. If you’re not animating an item with moving gun parts, you do not need to place the file in your unity scene, you can just replace the model_0 and model_1 with your own models.
Part 3: Customization
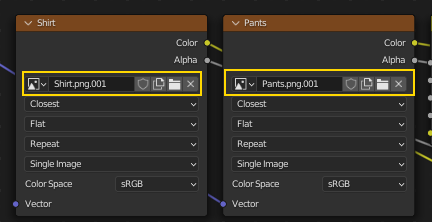
While replacing the shirt, pants or face, you must work in rendered view (eevee and cycles work.). Otherwise it won’t work. To access the customizable material first you must change the material of the player mesh from PlayerWorkbench to PlayerCustomizable
Why is there a material called PlayerWorkbench?
This is used for seeing the character while animating in viewport shading mode (Workbench)

Afterwards go to shading which you can see on top of the blender window.
Your character’s face may be pink and that is ok! This is a side effect of the method I am using to give you a way to change the faces without going into a texture editing software.
Just manipulate the offset value. You can keyframe this value to create face animations.

You can change the shirt via these texture inputs.

If you’re going to have multiple unique characters on screen at once, just duplicate the material.
Part 4: Well on that note.
This is pretty much everything I (think) I covered about this rig. I hope you guys have, if you have any questions about the rig, DM me at “derente” on discord.
2.2 CHANGELOG
- Updated the model
Download links:


